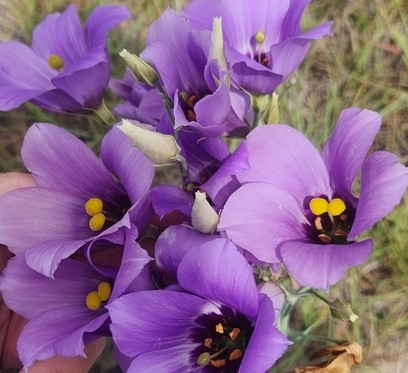
So, ethical collection of Bluebell (Eustoma spp.) seeds is far more involved than actual planting of the seed. The biggest hurdle is the tiny size of the seed we are working with. After seed capsules are dried and split, and seed has been collected, the seeds are ready to start germinating. These very (very!) tiny seeds require light for germination. The problem with that is these seeds are SO small, that they dry out very quickly. It’s important to bridge the gap between too little moisture, and enough light for germination to occur. I think this is part of the reason these seeds have such a reputation of being difficult to work with and hard to germinate. We do offer seeds for this and other native Texas Species through our Etsy shop, here.

We tried several methods to germinate these little guys before settling on one that seems to allow for a large number of seeds to germinate successfully all at one time. The first thing we tried was utilizing a bamboo skewer moistened, and then used to pick up individual seeds to place them on a damp paper towel. The paper towel was placed in a zip bag, and the whole setup was placed under a grow light. This worked fine, and germination was relatively quick.
The problem with this method was that the tiny rootlets of the seedlings would thread themselves through the paper towel, and the result was taking sharp nail scissors, and clipping each individual seedling out with it’s little piece of paper towel, then pressing the towel piece carefully onto moist substrate for the Bluebell to grow out. If you think the seeds are tiny, boy, those seedlings. By the time they have their first set of true leaves, they span the distance of the center of this “o” and damaging rootlets typically resulted in loss of the seedling. Also, seed starting was pretty constricted to what fits inside a zip bag to keep moisture up enough for the seedlings to germinate and grow.
Currently, we utilize seed starting peat pellets. They arrive compressed, and need to be rehydrated. We like these, as the size is nice, and the wrapper comes off easily when time to up-pot (As an Amazon Associate I earn from qualifying purchases). we line a small plastic seed tray with them, and add water until they are fully hydrated. They expand quite a bit, and the nice thing about them is they work in something as small as a clean take-away food tray, so you can scale germination up or down easily. The biggest benefit of this method is it’s easy to keep moisture up high enough for germination to occur, with enough air flow to prevent mold. Also, this allows us to germinate in an open-top container to keep an eye on the delicate (have we mentioned tiny?) seedlings. We try to place seedlings far apart on each starter pellet to make transplant easier later. We use a moistened bamboo skewer to pick up individual seeds (scatter a very small number of them on a white porcelain plate so they are far enough apart to pick up and placed individually) and touch the tip to the rehydrated seed starter pellet.

The peat substrate must not be allowed to dry out during germination (we have found that if the substrate dries completely, the seeds die before they germinate), so the simplest thing for us to do is fill the bottom of the tray with water every few days, allowing the bottom of the tray to become dry between watering. The delicate seedlings don’t do well if top-watered, so using something with a narrow spout to gently guide the water to the bottom of the tray works best. Notice that the seedlings in this picture are beginning to get their first set of true leaves, and have a cute, whorled arrangement.
Getting them to about half the size of a US dime requires patience. They will get there on their own time. Trying to transplant them before that CAN be done, but it is very stressful on the tiny plants, and loosing a few is very likely. Even at half the size of a dime, one must work gently with the plants, making sure to do as little damage to the roots as possible. We do this by dividing up the peat pellet into however many pieces as there are plants. We gently break them apart, and press each “bed” of peat into the new substrate, pressing gently but firmly around the base of the plant, giving the peat as much contact with the new substrate as possible, thereby making it easier for the baby bluebell to stretch it’s roots through the peat directly into the new substrate. From there, they don’t need as much careful attention to moisture, but still need to be kept on the moist side.

We keep them in a protected greenhouse from this stage, and as they start reaching the bounds of their four inch pots, we move them outside. Slowly reducing the amount of water we give. That’s it! Well, it’s still pretty involved, but give it a go, and feel free to reach out to us if you’d like more guidance!
Make a one-time donation
Make a monthly donation
Make a yearly donation
Choose an amount
Or enter a custom amount
Your contribution is appreciated.
Your contribution is appreciated.
Your contribution is appreciated.
DonateDonate monthlyDonate yearly

Leave a Reply to hambonesmarketCancel reply